This tutorial explains how SILK can be used to discover links between concepts in controlled vocabularies. By way of example, we have used SILK to create a mapping between the Named Authority Lists (NALs) of the Publications Office of the EU and the MARC list of the US Library of Congress.
The SILK Workbench is an open-source software solution for link discovery between controlled vocabularies. It enables to analyse a set of controlled vocabularies represented as SKOS RDF files and to automatically discover links between the concepts within these vocabularies. Click here to download the SILK Workbench.
In this tutorial we will use SILK to create a mapping between the following controlled vocabularies:
- The Countries Named Authority List of the Publications Office of the EU: The NAL’s, also known as Common Authority Tables (CATs), controlled vocabularies or value lists, are harmonised codes and multilingual labels used to facilitate data exchange between EU Institutions. The NALs are available in different formats, amongst which as SKOS data in RDF/XML.
- The MARC Countries list of the US Library of Congress: The US Library of Congress provides linked data services where users can access and download controlled vocabularies & authorities useful for describing and indexing information resources.
Both controlled vocabularies use URIs to identify countries. Compare, for example, the following URIs for the country of Luxembourg
- Metadata Registry: http://publications.europa.eu/resource/authority/country/LUX
- Library of Congress: http://id.loc.gov/vocabulary/countries/lu.html
SILK represents mappings between NALs using the SKOS language (skos:exactMatch). In the case of the URIs for Luxembourg this is expressed as N-Triples:
To map the two lists, the following input files are used:
Metadata Registry:
- File: countries-skos.rdf
- Format: SKOS
- URI: http://publications.europa.eu/mdr/resource/authority/country/skos/countries-skos.rdf
- Number of records: 308
Library of Congress:
- File: countries.rdf
- Format: MADS and SKOS
- URI: http://id.loc.gov/vocabulary/countries.rdf
- Number of record: 333
1. Create and configure the project
The first step is to create a new project in the Workspace tab. In this tab all the projects managed by a user are listed.
A project must contain the following object:
- URI prefixes which are used in the project;
- list of data sources;
- at least a linking task;
- an output.
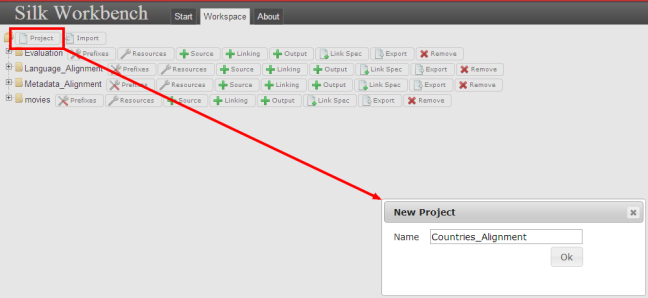
To create a project, click on the Project button and fill in the project name.
Once a project is created, indicate the namespaces in the input files. To edit them, click on the Prefixes button of the project Countries_alignment and complete the list.

2. Import both controlled vocabularies using SKOS
In the SILK, to define the source datasets, the files have to be uploaded in the system as resources. To upload the two files which will be used to do the mapping, click on the Resources button and fill in the fields for both files in the Upload resource panel.

Once the files are defined as resources and uploaded in the tools, indicate the data sources which will be used to do the mapping. Click on Source button and select the resources in the RDF dump tab (LOC_Countries and NAL_Countries previously uploaded as Resources.)
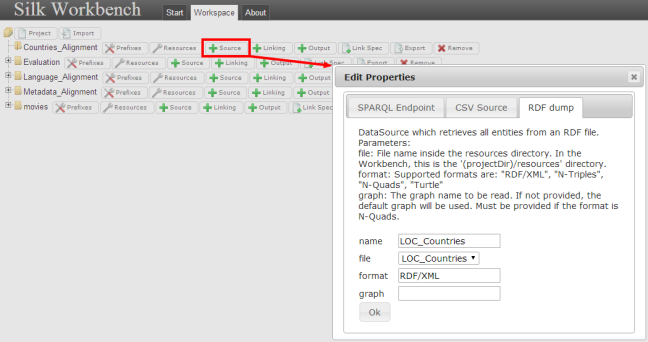
SILK also enables SPARQL Endpoint and CSV Source but this is not part of the tutorial.
3. Configure the alignment
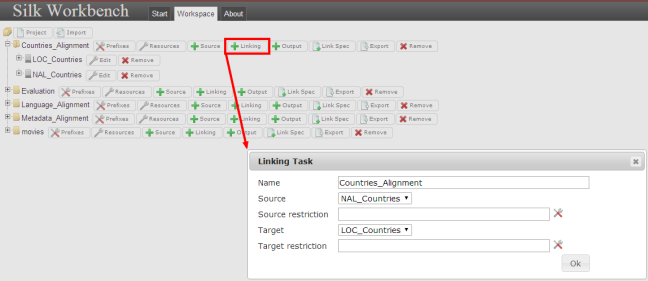
To prepare the alignment process, click on the Task button in order to get a linking task in the project and select the source and the target. This linking task enables the drawing of a job which could be launched by the SILK engine in order to generate the links.
At this step, the project contains the following objects:
- the resources,
- the data sources, and
- the linking task.

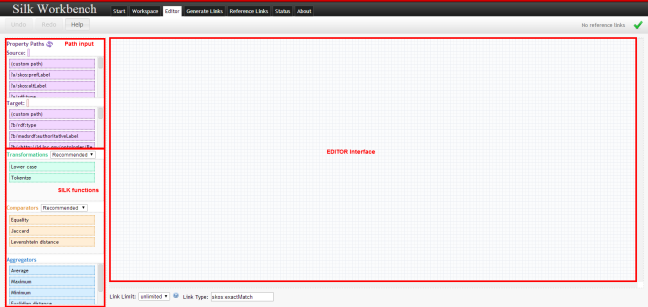
To create the alignment, click on the Open button of the linking task object. The Editor is displayed, this is the linkage rule editor interface. This interface enables users to edit rules in a graphical way.
This editor is divided in two parts:
-
The left panel which contains four components:
- The path input component with the source and target path fields.
- And the SILK function components which enable to manipulate the data source: Transformations, Comparatorsand Aggregators. For each of them a set of functions are available, for instance Alpha reduce, Equality, etc.
- The right panel is the editor interface itself which allows a user to drag and drop path fields or functions available in the SILK components part.
In this tutorial, the following paths have been identified to link the two vocabularies:
- Library of Congress - madsrdf:authoritativeLabel: contains the english country name <madsrdf:authoritativeLabel xml:lang="en">Brunei</madsrdf:authoritativeLabel>
- Metada Registry - skos:prefLabel: contains also the country name in several language <skos:prefLabel xml:lang="bg">Бруней</skos:prefLabel>
The second path skos:prefLabel will be restricted with the language attribute xml:lang to return only the english version of the country name as the Named Authority List Countries translate the country name in several language. Thus for the target source Named Authority List, the path will be:
skos:prefLabel[@lang = 'en'].
Then we have to define the job in the following way. We will start by transforming the string contains in the paths by removing space and empty values. Then each string will be transformed in upper case. These rules should be enough to compare the strings for this kind of data. Finally we will compare the strings with the function equality.
Thus for this mapping, we use the following objects:
- Path (Path component)
- Remove blanks (Transformation component)
- Remove empty values (Transformation component)
- Upper Case (Transformation component)
- Equality (Comparator component)
Once we drag and drop all the objects and link them, the job looks like the figure below.

The job is ready to run the automatic link discovery.
4. Run the automatic link discovery
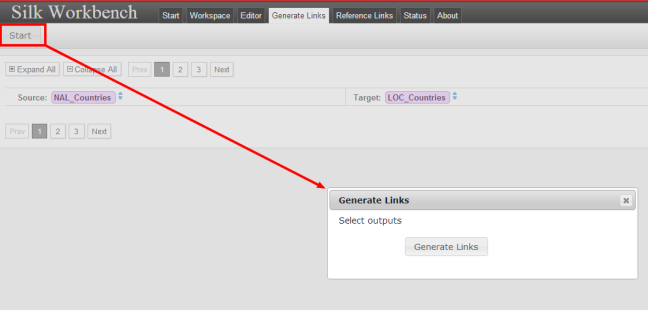
Once the job is designed, click on the Generate Links tab where the job can be launched by clicking on the Start button and Generate Links.
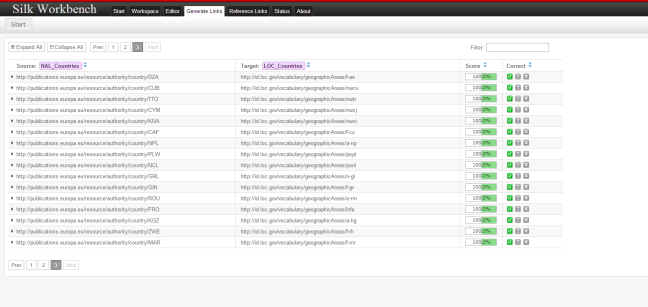
Once the links have been found, the user interface is refreshed and the web application offers to drill down on the link where a detailed summary of the steps designed in the job are displayed.
Moreover for each link, a score about the confidence ratio is indicated which enables the user to get an idea of the results.
In this screen, confirm if the link is correct or not, SILK offers to give a status to the links, the user can choose between 3 status:
-
to indicate and to confirm the links as correct, this links will be part of the positive reference link set,

-
to indicate the links as not decided, this links will not be part of the reference link set,

-
to indicate and to confirm the link as incorrect, these links will be part of the negative reference link set.


As the result meets our expectations, we select all the links.
Now, it is possible to export the result of the mapping.
5. Export the mappings in SKOS format
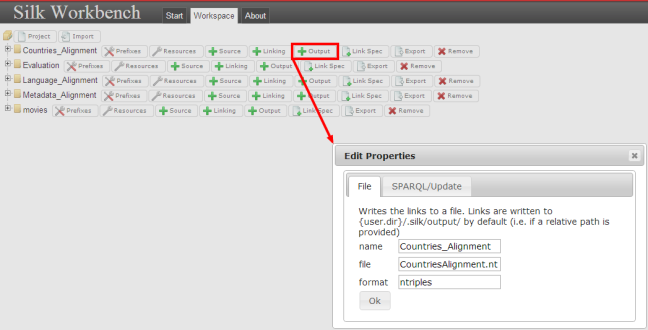
Now we have to add the output file which will store the result of the mapping done with the SILK Workbench. To create the output, click on the tab Workspace then click on the Output button in the project created at the beginning of the tutorial. Then fill in the fields related to the output.
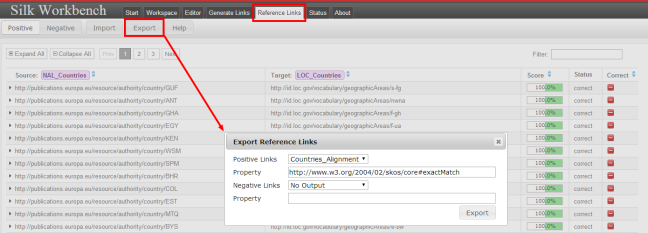
Once the output is created, click on the linking task and on the reference links tab. In this tab, an export function allows the user to export the mapping in N-Triples format. Select the output created previously.
As a result, 215 records have been identified with an exact match. So the next steps not described in this tutorial should be to identify countries with no match or close match.
Nature of documentation: Manual (technical documentation)
Comments
See also this webinar on SILK by the LOD2 project:
http://www.youtube.com/watch?v=vP1UDKeZsQk